Sub-Total: $0.00
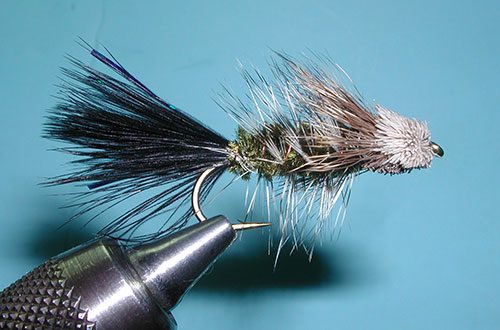
Bow River Bugger – the best of two
Bow River Bugger, Black
Tying Instructions
1.Secure the hook in the vise and attach the leadfree wire to the shank starting about 1/3 the shank length from the eye.
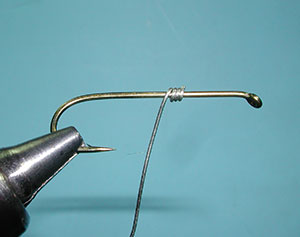
2. Wrap about 15 to 20 wraps toward the bend of the hook.
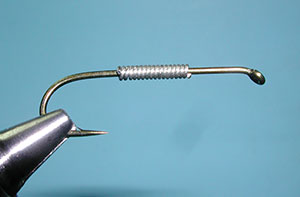
3. Attach the thread to the hook shank and wrap over the wire multiple times to secure it to the shank keeping the wire wraps from turning on the shank.

4. Clip the tips off two marabou plumes or use two blood marabous. Match the tip ends and measure the tips so that it is about 3/4 to a full shank length.
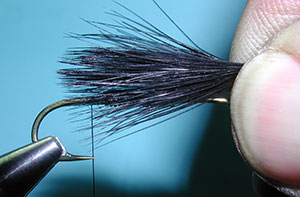
5. Place the tips at the bend of the hook and secure with two or three tight thread wraps.
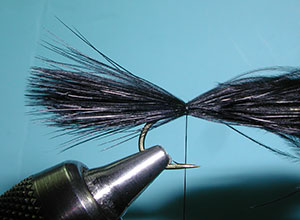
6. Trim off the tag ends of the marabou tips at the base of the wire wraps and secure with thread wraps securing the tips as a tail.

7. Attach 3-4 strands of flashabou to the base of the tail so that the strands are on the top of the tail and do not exceed it’s length. Secure the tag end of the flashabou with thread over the wire wraps.
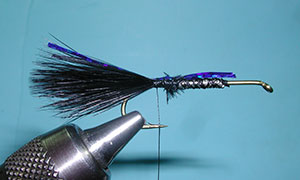
8. Next, attach a strand of copper wire for a ribbing at along the side or below the hook shank. Secure the wire up to the base of the tail.
9. Attach a piece of medium Chenille at the base of the tail. Pull the fuzz off the end of the chenille so that the inner core is secured by the thread to the hook shank.
10. Wrap the chenille forward for an even body. You may need to take the twist out of the chenille as you wrap forward. Wrap up to the end of the wire wraps and secure with a couple of tight wraps of thread.

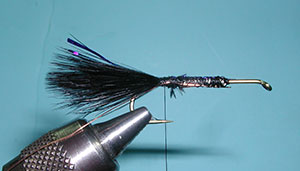
11. Select a rooster cape hackle which has a degree of webbiness to it. The hackle should be a couple of hook sizes smaller than the hook you are using since it will be palmered over a thick chenille body. Attach the base of the hackle directly in front of the chenille body.
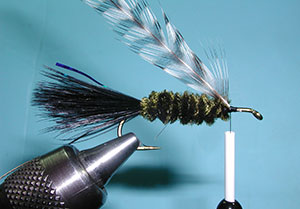
12. Wrap the hackle a full turn in front of the chenille body and then wrap the hackle back towards the base of the tail with spirol wraps.
13. Once the hackle reaches the base of the tail, secure the hackle tip with a turn of the wire ribbing.
14. Wrap the ribbing forward with spirol wraps securing the hackle to the chenille body. Secure the end of the ribbing at the front the hackle base with thread wraps. Trim off the hackle tip where the first ribbing turn was made.

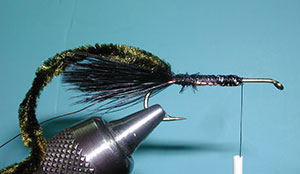
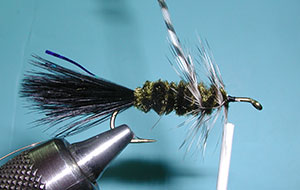
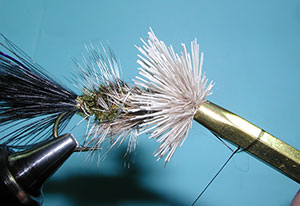
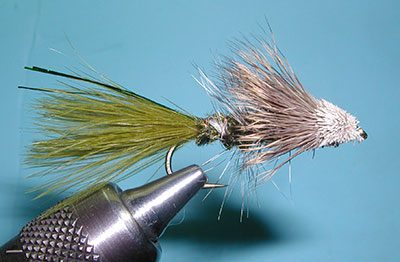
15. Cut a bundle of deer hair off the hide and even the tips of the deer hair within a stacker.
16. Measure the deer hair bundle so that it is about half the hook shank.
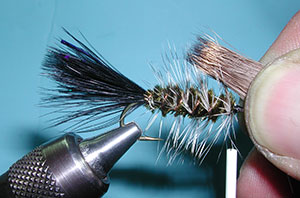
17. Trim the base of the hair so that the base is secured to the hook shank just in front of the hackle.
18. Secure the base of the bundle with a couple of thread wraps without tightening to much. With the third thread wrap, gradually tighten the thread and release the bundle so that the bundle will spin on the hook shank to evenly distribute hair around the shank.
19. Secure the base of the deer hair with three to four more tight wraps.
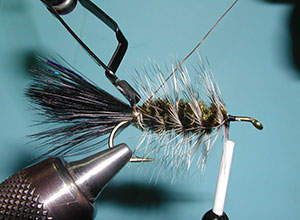
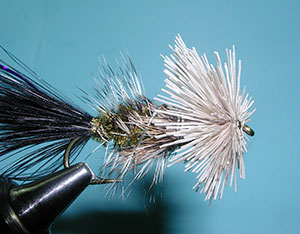
20. Take a piece of leadfree wire and wrap the deer hair to the body of the pattern. This will give you room to trim the two hair bundles that will be spun next.
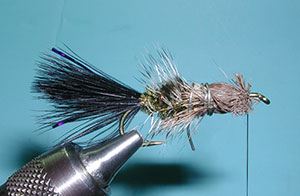
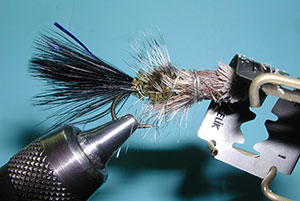
21. Clip a second bundle of deer hair from the hide and trim off the tips as well so the the bundle is about a 1/2 inch in length. Attach the bundle to the hook shank directly in front of the first spun bundle with a couple of wraps.

22. Spin the hair as you did earlier. Secure with two to three additional thread wraps.

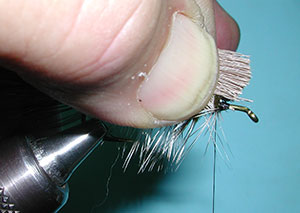
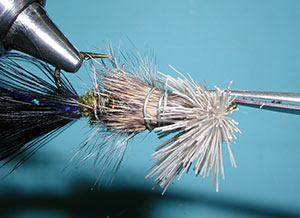
23. Take a Hair packer and push back the hair to create some room for the third deer hair bundle.
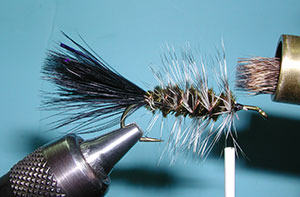
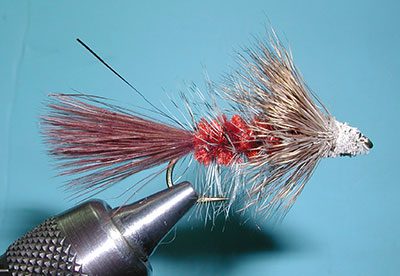
24. The third bundle of hair is bleached deer hair. The light color is to mimic the mouth of a muddler. Again attach with a couple of thread wraps and spin the material.
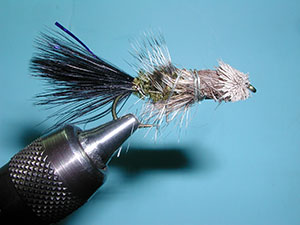
25. This final bundle needs to be packed once more to create some room for tying off just behind the eye of the hook.
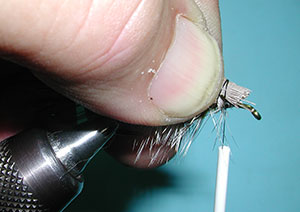
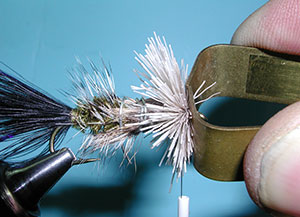
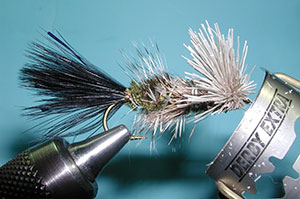
26. Use a half hitch tool to secure the thread without capturing some deer hairs.
27. Use a Whip Finish to firmly secure the thread to the hook shank behind the eye.

28. Trim off the thread near the base of the eye.
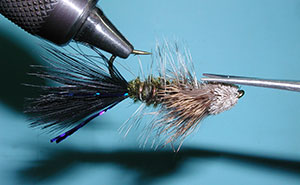
29. Turn the bugger pattern upside down and trim the deer hair flat along the body just behind the eye.
30. Turn the bugger pattern up once more and trim the deer hair above the shank with a bent razor blade. Use a Stonfo razor holder or something similar as this can be quite dangerous just using your hand.
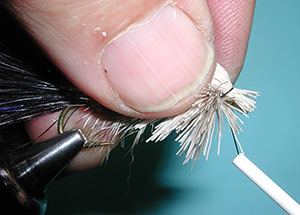
31. Trim the hair at a sloping angle so that the deer hair sweeps back.
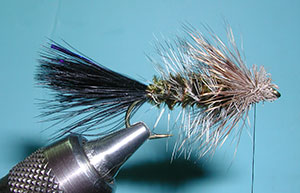
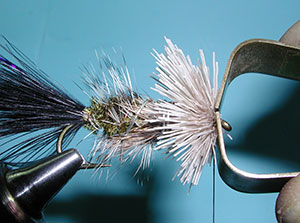
32. Use scissors to make some final touch ups on your sculpting.
33. Unwrap the wire holding back the deer hair collar and fluff everything back up with your fingers.
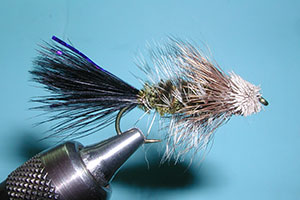
34. Turn the pattern upside down once more and trim the base of the head flat and parallel to the hook shank with scissors.
35. The Bow River Bugger. Heavily weighted and with a loosely packed head to allow better submersion. Try this along the bottom of the stream.

| Materials
to Order Material, click the link |
|
|---|---|
| Hook | Tiemco 5263 size 4-8 |
| Thread | Uni-thread 6/0, Black |
| Head | Bleached Deer Hair |
| Weight | 15-20 wraps of 0.020 lead-free wire |
| Body | Dark Olive Medium Chenille |
| Ribbing | Medium Copper Wire |
| Collar | Natural Deer Hair |
| Tail | Black Marabou with 3-4 strands Holographic Magnum Blue Flashabou |
| Hackle | Rooster Cape Grizzly Hackle |
Bow River Bugger
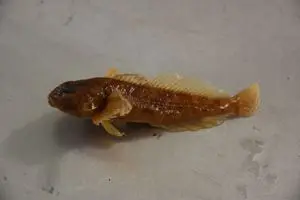
Bow River fishing guide, Peter Chenier, developed the Bow River Bugger in the 1980s in Calgary. It is a wooly bugger with a muddler style head. It can be fished on a dead drift or as a streamer for a minnow or sculpin imitation. As a dead drift, the bow bugger is most often presented at the bottom of the stream as a muddler should be. The head is packed loosely so as to reduce floatation and is heavily weighted. Coneheads give the pattern a nice sleek look as well as some additional weight.
Rig Set-up
Within fast streams, you might add some split shot to get it down. In George Daniel’s book, “Strip-Set”, he illustrates a Bow River Bugger rig that was designed by Greg Bricker of Freestone Outfitters in Bozeman, MT. Here the suspender indicator is placed equal to the depth of the water column. Greg uses 1/0 and B size split shot about 6-12 inches from the fly depending on how high you want the Bow Bugger to ride above the stream surface.
Most popular colors are Black, Olive, and White. The tail should consist of two tips from Marabou plume or blood marabou. Use 3-4 strands of Flashabou only to keep the flash to a minimum. The hackle should be sized about two sizes less than the hook gap due to the chenille body that the hackle wraps around. Keep about 1/3 of the hook shank clear in front of the body to spin the deer hair.
Variations
Bow River Bugger, Olive
| Hook | Tiemco 5263 size 4-8 |
| Thread | Uni-thread 6/0, Black |
| Head | Bleached Deer Hair |
| Weight | 15-20 wraps of 0.020 lead-free wire |
| Body | Dark Olive Medium Chenille |
| Ribbing | Medium Copper Wire |
| Collar | Natural Deer Hair |
| Tail | Olive Marabou with 3-4 strands Holographic Magnum Green Flashabou |
| Hackle | Rooster Cape Grizzly Hackle |
Bow River Bugger, Brown
| Hook | Tiemco 5263 size 4-8 |
| Thread | Uni-thread 6/0, Black |
| Head | Bleached Deer Hair |
| Weight | 15-20 wraps of 0.020 lead-free wire |
| Body | Brown Medium Chenille |
| Ribbing | Medium Copper Wire |
| Collar | Natural Deer Hair |
| Tail | Brown Marabou with 3-4 strands Holographic Magnum Copper Flashabou |
| Hackle | Rooster Cape Grizzly Hackle |
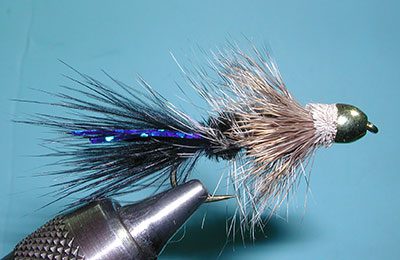
Conehead Bow River Bugger, Black
| Hook | Tiemco 5263 size 4-8 |
| Thread | Uni-thread 6/0, Black |
| Head | Gold Conehead,Medium or Small |
| Weight | 15-20 wraps of 0.020 lead-free wire |
| Body | Black Medium Chenille |
| Ribbing | Medium Copper Wire |
| Collar | Natural Deer Hair |
| Tail | Black Marabou with 3-4 strands Holographic Magnum Blue Flashabou |
| Hackle | Rooster Cape Grizzly Hackle |
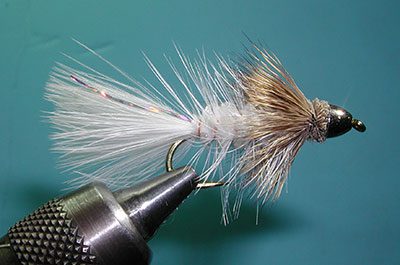
Conehead Bow River Bugger, White
| Hook | Tiemco 5263 size 4-8 |
| Thread | Uni-thread 6/0, Black |
| Head | Silver Conehead, Medium or Small |
| Weight | 15-20 wraps of 0.020 lead-free wire |
| Body | White Medium Chenille |
| Ribbing | Medium Copper Wire |
| Collar | Natural Deer Hair |
| Tail | White Marabou with 3-4 strands Holographic Magnum Silver Flashabou |
| Hackle | White Chinese Saddle Hackle |