Nymph Rigs | ||||
| ||||
| ||||
Streams | ||||
Dead Drift Presentation | ||||
The Dead Drift presentation is used in riffles and runs of streams. It is usually done with a floating line and a weighted nymph. Cast upstream a short distance (1-30 feet) and allow the rod to follow the nymph as it travels downstream. Keep the rod tip parallel to the surface. A strike indicator is sometimes used. Watch the indicator or the line, when a pause or movement occurs that is unnatural, lift the rod tip. Strikes can be subtle and you might not realize that a fish is on until you raise the rod tip. Then, set the hook. The fly needs to bounce along the bottom and you should be able to feel this when the fly is drifting directly in front of you. If you don't feel the bottom bounce, put some more weight on. The fly will drift upwards at the end of the drift, many strikes will occur at this point. This presentation is good for mayflies, emerging caddis, and stoneflies. The Tuck Cast is a good choice with this type of presentation as the cast allows the nymphs to quickly reach the bottom. | ||||
 | ||||
Leisenring Lift | ||||
The Leisenring Lift was developed by Jim Leisenring in the early 1940's. It utilizes the Dead
Drift Presentation but incorporates lifting the rod tip as the nymph passes by in order to keep the amount
of line within the water to a minimum. This will decrease the amount of drag. As the nymph approaches the
presumed location of the trout, the rod tip is paused causing the nymph to lift, due to drag, as an emerging
insect. Further lifting of the rod tip will speed up the lift rate of the fly. The technique works best within
consistent flows of 2-3 feet in depth where the flyfisherman has direct control of the fly with a straight
leader line.
| ||||
High Stick Nymphing | ||||
 This method is most often used within pocket water. Czech Nymphing is associated with High Stick Nymphing. The earliest account we have of this technique is in the 1920's by a Wintu Indian by the name of Ted Towendolly in the Upper Sacramento river area (Ted Towendolly and the Origin of Short-Line Nymphing on the Upper Sac by Eric Palmer). Drifts are short (1-30 feet) and the fly has to get to the bottom quickly. No indicator is used since the faster surface water will tend to pull your fly off the bottom due to the current pressure on the indicator. Many prefer to use a 7-10 foot leader of 4X Fluorocarbon since it sinks faster than a tapered leader to get the nymph down quickly. Watch the line movement for any strike or use a tight line and feel for the take. Use a leader length that is about the same as the rod length. The weighted nymph must sink quickly and be able to touch bottom. If you need additional weight to the fly, try added split shot about 3-4 inches above the fly. Wade within a rod length or two of the pocket you wish to fish. Flip the fly upstream of the pocket and extend the rod tip high over the position where the leader enters the water at a 25-30 degree angle. Keep slack to a minimum and follow the leader downstream to the end of the drift. Keep some tension on the line by lifting the rod tip after the flies have reached the bottom. At the end of the drift, lift the fly and flip it into the next pocket. If you are using soft hackles, let the fly swing up with the current to imitate an emerger before lifting the flies. | ||||
Across and Down Presentation | ||||
 The across and down presentation is upstream from the fish. It is generally within a 20 to 40 feet range. Cast directly in front of your position and allow the line to drift in a sweep across the stream. The nymph will sink during the first part of the sweep, then rise at the end. Strip the line slowly upstream at the end of the sweep to provoke at strike. The presentation can be used for swimming mayflies, emergers, and stoneflies. During the retrieve, try dropping your rod tip down. This action may stimulate activity as the fly drops down and moves backwards. A reach mend or curve cast will help keep the fly downstream of the fly line. | ||||
Up and Across Presentation | ||||
The Up and Across Presentation is often associated to wet flies and tight-line nymphing. Casts are usually longer than 30 feet using a standard water haul cast. For wet flies, this presentation allows for a dead drift, looking for a sudden line stop as the wet fly rides the current. There are some actions that can be utilized to enhance the presentation. As the wet fly begins to pass by, tighten the line and begin a sudden jiggle to animate the swing and swim. Once the wet fly is slowed below you, try a hand twist retrieve followed by raising the rod to allow the fly to skitter on the surface. These actions will greatly enhance the presentation. For tight-line nymphing, drop the rod tip immediately after the stop for the forward casting stroke to get all of the line on the water. Strip the line with a long pull of your line hand keeping slack from the drift. At the end of the long strip, elevate the rod to manage the slack as your line hand prepares for another pull. After a second long pull, the rod tip elevates again managing the slack and the rig will be close enough to finish with a High Stick presentation as the rig passes by. Always lead the nymphs through the drift maintaining a tight-line connection to the nymphs looking for a stop to the movement. You can focus on the belly of the line or a 12" sighter attached within the leader. The sighter should be positioned about 1.5 times the depth of the water you are fishing. | ||||
European Nymphing Styles | ||||
The evolution of European nymphing styles started in the mid 1980's with Polish competitors winning many fly fishing competitions, such as the 1985 World Championship, using a short line nymphing method. This method used no indicators but sight lines on the leader. It also used no split shot or accessory weight as the nymphs themselves were weighted. The Czechs adapted these styles and began winning many of the competitions themselves. World Championships by the Czechs were won in 1990, 1994, 1996, and 2001. The term "Czech Nymphing" was popularized by British angler, Oliver Edwards, and many fly fishing guides throughout the world learned and practiced the technique. The French and Spanish came up with their own techniques using a longer leader and upstream casts. The French nymphing methods resulted in 6 World titles and the Spanish methods have been used extensively by our own Team USA. | ||||
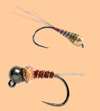
Czech NymphingThe Czech technique is mostly associated with three flies, although the use of two flies is often used. A sighter indicator is tied onto the butt section of the leader and attached to the flyline. Hybridized versions of this rig will attach a 4-6 foot section of colored monofilament line, ie Stren, to the flyline and attach the sighter indicator below the monoline. On a 3 fly rig, the bottom fly is the lightest, ie wet fly; the middle fly is the heaviest, ie beadhead stonefly; and the top fly is a medium weight fly, ie Czech nymph. On a 2 fly rig the heaviest fly is always the bottom (point). The flies are attached to a 4' to 8' fluorocarbon leader with 4-5" tags that are created with Surgeon's or Blood knots. The distance from the middle fly to the fly line should be 1 1/2 times the depth you are fishing. The rig is lobbed a short distance upstream and the middle fly sinks to the bottom forcing the lighter fly to trail along deep but higher than the beadhead. The three flies work together with the heaviest beadhead bouncing off the bottom, the lightest fly in the middle of the water column, and the medium weight nymph drifting through the upper portion. A tight line to the flies is maintained by raising the rod tip and slightly leading the nymph rig through the feeding zone. There is a quick lift of the rig at the end of the drift and the rig is wrist snapped back behind the angler for the next lob cast. Most nymphers will use this technique in about 3-4 feet of water and will work their way upstream covering the feeding zones. It works best in pocket water and heavy riffles. Czech nymphs are generally Caddis Larvae type patterns and can be used exclusively with the nymphing technique. But, the technique can also be applied to a number of other nymph patterns as well such as wet flies, pupa patterns, and stones.
|
||||
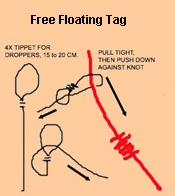
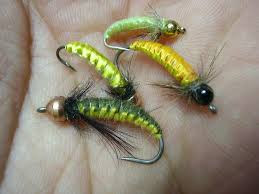
Polish NymphingPolish nymphing is very similar to Czech nymphing, both are short line presentations. The sighting indicator is placed about 20-30 inches below the butt section of the leader. The Polish nymphing rig is generally a two fly system with the heaviest fly placed on the bottom or "Point" position. The Poles also used an adjustable tag to their upper fly that would slide between two blood knots. However, competition rules no longer allow a freely floating tag and the upper tag is now tied the same as the Czechs with a blood knot tag but a little longer, 8-12 inches. When fishing shallow runs or riffles, the heavier fly is tied on top, allowing both flies to remain at the proper depth. The presentation technique remains the same as the Czech method with a lob and lead approach. Polish nymphing uses many of the Czech nymph patterns but they are noted for their woven nymph patterns.
| ||||
French NymphingFrench nymphing is a long line presentation with an upstream cast. It is a preferred method when fishing shallow waters, particularly riffles. The leaders are 12-20 feet in length and they tend to use longer rods up to 14 feet to handle them. The flies are cast directly upstream and pulled back through the water column by raising the rod tip. The leader is held above the surface to reduce drag. For the most part, the flyline is not used and the tapered leader with the weighted flies provide the loading for the cast. The sighter indicator is coiled which reduces the tension that the fish would feel when the fly is taken. Once the fish takes the fly, the coil will elongate allowing the angler to set the hook before the fish feels the line tension. The result is many more hook sets and the French proved it with 6 World Championships. The flies used on the French nymphing rig tend to be size 14 or smaller and are either beadheads or weighted flies.
| ||||
Spanish NymphingSpanish Nymphing is also a long leader with an up and across cast. It is a preferred method within slower runs and the bottom of riffle sections. It is also preferred where you tend to have spooky fish and need to be well away from being detected. Leaders will range from 15 to 25 feet. Generally, 3-2 flies are used within this rig and, due to the weight of the flies, a lob cast is usually necessary. The retrieve is either a figure eight hand retrieve or by stripping. Longer rods, 10-12 feet, are needed to maintain drift control and remove slack. Sighter indicators with different colored monofilament, such as a hy-vis nylon Stren Gold and Amnesia, built into the leader about 7 feet above the point fly. Watching the sighter section for movement or change of direction will give you the time to set the hook on a gentle strike. The flies used with Spanish Nymphing are often beadheads but can be heavier than those used with the French method. The heavier point fly should bounce on the bottom at it's own pace and is not led as in Czech nymphing.
| ||||
| ||||
Lakes | ||||
Count and Retrieve | ||||
Count and Retrieve Presentation is the most common technique on lakes. The rate of descent will be based on the type of sinking line that you use. Apply an overhead cast and count the seconds of descent that you need to get to a certain depth. It is important that you have a knowledge of the depth of the bottom and what kind of bottom structure is there. In shallow lakes of less than 7 feet, there is most likely submerged weedbeds, and you will want to count only to the depth that your nymph will not get hung up in the weeds. Fish are often found close to the bottom but there are times when the fish will be higher up in the water column. You will need to vary your counts until you find the depth that the fish are feeding within.
Types of Retrievals
| ||||
Lift and Settle Presentation | ||||

The Lift and Settle Presentation is useful for mayflies, particularly Hexagenia and Callibaetis nymphs. It is a shallow bottom technique
in which you let the nymph settle to the bottom and slowly retrieve for a couple of feet. Then, pause and let the nymph settle again to
the bottom. Repeat until the nymph is no longer able to reach the bottom. Then, bring up the nymph and recast. | ||||
Chuck and Sit Presentation | ||||
Midging with an Indicator | ||||
Midging with an indicator can be quite successfull on many of the alkaline lakes of the Sierras. It is a Chuck and Sit presentation that is sometimes helped with a little twitching. Midge Hatches can occur throughout the year and at any time. The primary area that most fish feed on midges is where they hatch near the bottom. The midges will make a slow upward journey and spend some time at the surface morphing from an emerging pupa into an adult. Use a 2 midge rig with the midges spaced about 12- 18 inches apart on a floating line with a 9 foot fluorocarbon leader using fluorocarbon tippet material as light as you can. A split-shot between the midges will help keep the leader straight and bring the rig to the bottom sooner. The dropper fly should be about 6 inches from the lake bottom. Attach a hemostat to the dropper fly and let it sink to the bottom. Locate the position of the leader at the surface and attach the indicator about 6 inches below this point. This will assure that the dropper fly will be 6 inches from the bottom. Start with a pupa dropper and an emergent pupa as a top fly. If the hits are on the top fly, switch the dropper to another emergent pupa and raise the rig to about 18" off the bottom. If the hits are on the bottom fly, switch the emergent to a pupa pattern. Color selection of the midges will also play a factor. | ||||
Surface Midging | ||||
When the midge pupa reach the surface they often bring the trout to the surface to feed on them. This can often occur during low light conditions. Use a floating line and dress the leader with floatant within a few inches of the midge. Cast to the rising forms that you sight and let it sit there. Try to mend your line to retain as little slack as possible. Strikes will be subtle. If you do not have any grabs try a slow retrieval with some twitching, then pause and let it sit. | ||||
Wind Drifting | ||||
Sometimes a strong wind will affect your Chuck and Sit presentation, particularly from a float tube. It will take you for a ride. This can actually become a good thing using sinking lines. Try this with Damselfly Nymphs, Flashback Callibaetis, Flashback Pheasant Tails, and Wooly Buggers. If the wind is too strong and you are moving too fast, then use of a sea anchor will help slow you down. If you have no wind, try a slow kick with your float tube. | ||||